Understanding the Process of Templating
Templating is a crucial technique employed by saddle fitters to assess and record a horse's shape during regular saddle fitting appointments. This process allows both the fitter and the owner to monitor changes in the horse's condition over time, ensuring a proper and comfortable saddle fit.
Importance of Regular Templating
Regular templating is essential for identifying any alterations in your horse's condition. Changes in workload or diet can significantly impact muscle development, ultimately affecting the fit of the saddle. Whether your horse experiences increased or decreased activity, or undergoes weight fluctuations, templating helps ensure the saddle accommodates these changes.
Essential Tools for Templating Your Horse
To create templates, you'll need the following:
- Flexicurve
- Templating Cards
- Pen
- Your horse
Before You Begin Templating
Before starting the templating process, keep the following in mind:
- On your paper, note the date, L (Left side of the horse), and R (Right side of the horse).
- Place the flat side of the flexicurve towards the horse's ears for accurate templates.
- Always template from the nearside for consistency.
- Ensure the flexicurve is in the correct position on both sides.
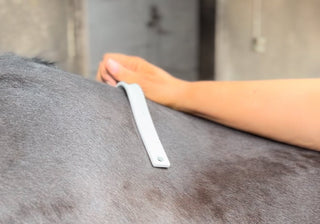
- Use a flat hand to press the flexicurve against the horse to avoid creating ridges.
- Ensure the horse is standing square on a level surface for accurate templates.
- Don't do your template directly after exercise.
Now that you are prepared, let's guide you through the templating process.
Step 1 - Wither Template: Three Fingers Behind the Scapula
- Locate the scapula (shoulder bone) and place three fingers behind it.
- Position the flexicurve over the withers with the center over the horse's middle.
- Mold the flexicurve to the horse's shape using a flattened hand.
- Have a friend hold the flexicurve in place as you check the other side.
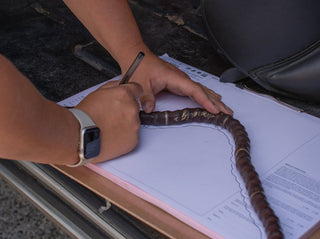
- Transfer the flexicurve to your paper and draw the outline of your horse's back.

Step 2 - Cantle Template 3: T18
- Locate the last rib and follow the curve to find T18 (18th Thoracic vertebrae).
- Place the flexicurve at T18 and take the third template.
- Ensure the saddle panels do not extend beyond T18.

Step 3 - Back Template: Along the Horse's Spine
- This final template showcases the horse's back along the spine.
- The flexicurve should end at T18, with the other end moving up with the withers.
- Pinch the flexicurve at T18 and the first template point, transferring it carefully to your paper without altering its shape.

Start Templating Your Horse with the Perfect Fit Kit
Now that you understand the importance of regular templating for your horse's well-being and saddle fit, it's time to take action. Ensure comfort and performance with the Complete Back Templating Starter Kit, from the Perfect Fit Kit.
The Perfect Fit Kit is designed to simplify the templating process and comes with everything you need to monitor changes in your horses shape. Stay in tune with your horse's changing needs by following our step-by-step guide for accurate and insightful templates.
Empower yourself with the knowledge of your horse's unique shape and make informed decisions about their saddle fit. With the Perfect Fit Kit, you're not just ensuring a well-fitted saddle – you're actively contributing to your horse's overall health and happiness.
Take the first step towards an optimal saddle fit. Order your Complete Back Templating Starter Kit now and embark on a journey to a more comfortable riding experience for both you and your horse.
If you have any worries or concerns regarding the fit of your saddle be sure to have to have it checked by your saddle fitter, or give us a call at Saddles Direct on 01282 471 911


